
Hip-to-Gable Loft Conversion Party Wall Guide (London)
Introduction
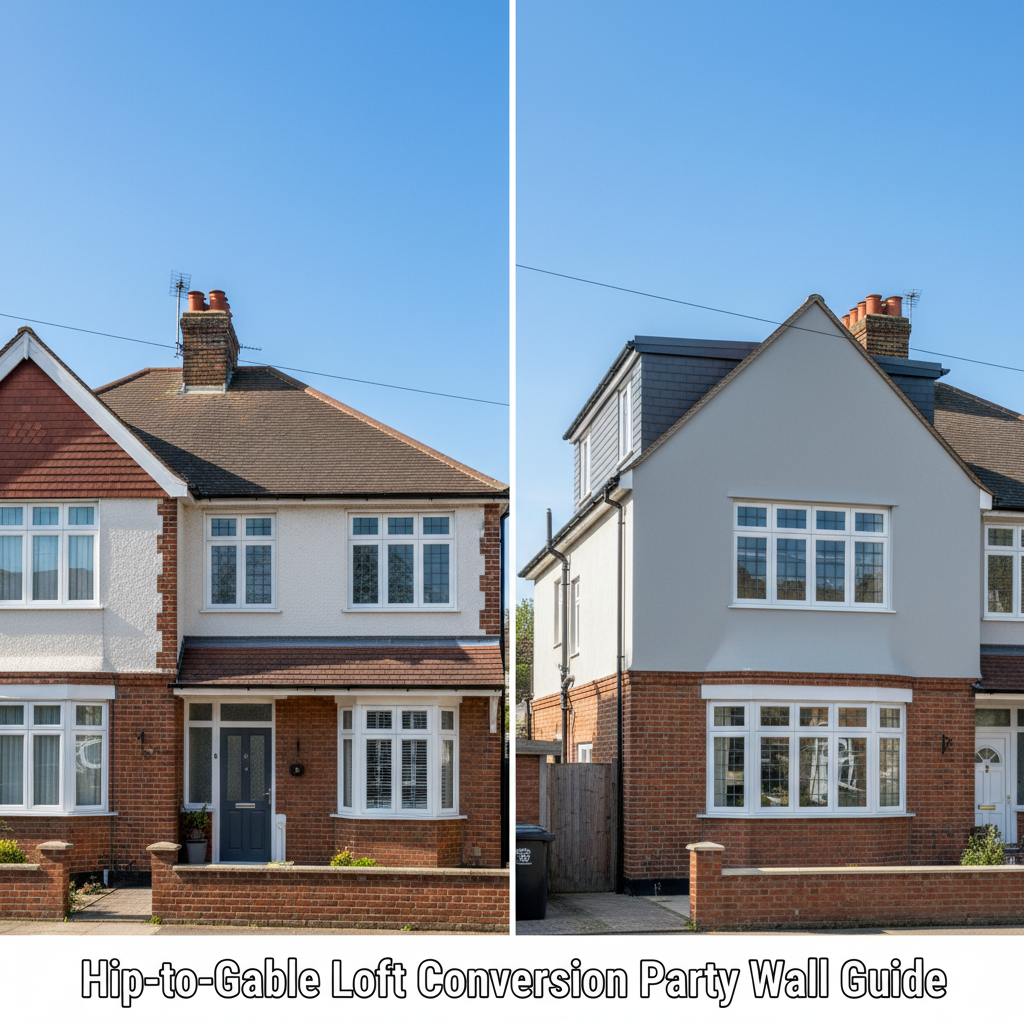
Hip-to-gable loft conversions are one of the most transformative projects for semi-detached homes across the UK, converting underutilized hip roof space into full-height rooms that can add 30-50% more usable loft area and £30,000-£60,000 in property value. Unlike simple dormer loft conversions that work within existing roof heights, hip-to-gable conversions involve raising the party wall significantly—typically 1-2 metres—to create a vertical gable end where a sloping hip previously existed.
This fundamental change to the party wall structure means almost every hip-to-gable conversion in semi-detached properties triggers Section 2 of the Party Wall etc. Act 1996, which governs repairs, alterations, and raising existing party walls. The party wall procedures for hip-to-gable projects are more involved than standard loft conversions with dormers because you’re not just cutting into the party wall—you’re substantially increasing its height and altering its structural profile.
For homeowners in semi-detached properties throughout London, Manchester, Birmingham, Leeds, and across the UK, understanding the party wall implications is essential before committing to a hip-to-gable design. Typical party wall costs for hip-to-gable conversions range from £800-£1,300 (depending on whether one or both neighbors are affected), with the entire party wall process typically taking 5-7 weeks from initial notice to Award completion—longer than dormers but faster than basement extensions.
This comprehensive guide explains exactly what hip-to-gable conversions require under the Party Wall etc. Act 1996, why raising the party wall creates specific obligations, how weatherproofing the new gable end affects party wall procedures, typical timelines and costs, and how to navigate the process successfully whether you’re converting a 1930s suburban semi in Croydon or a Victorian semi-detached villa in Ealing.
What Is a Hip-to-Gable Conversion and Why Does It Trigger Party Wall Requirements?
Understanding Hip Roofs vs Gable Ends:
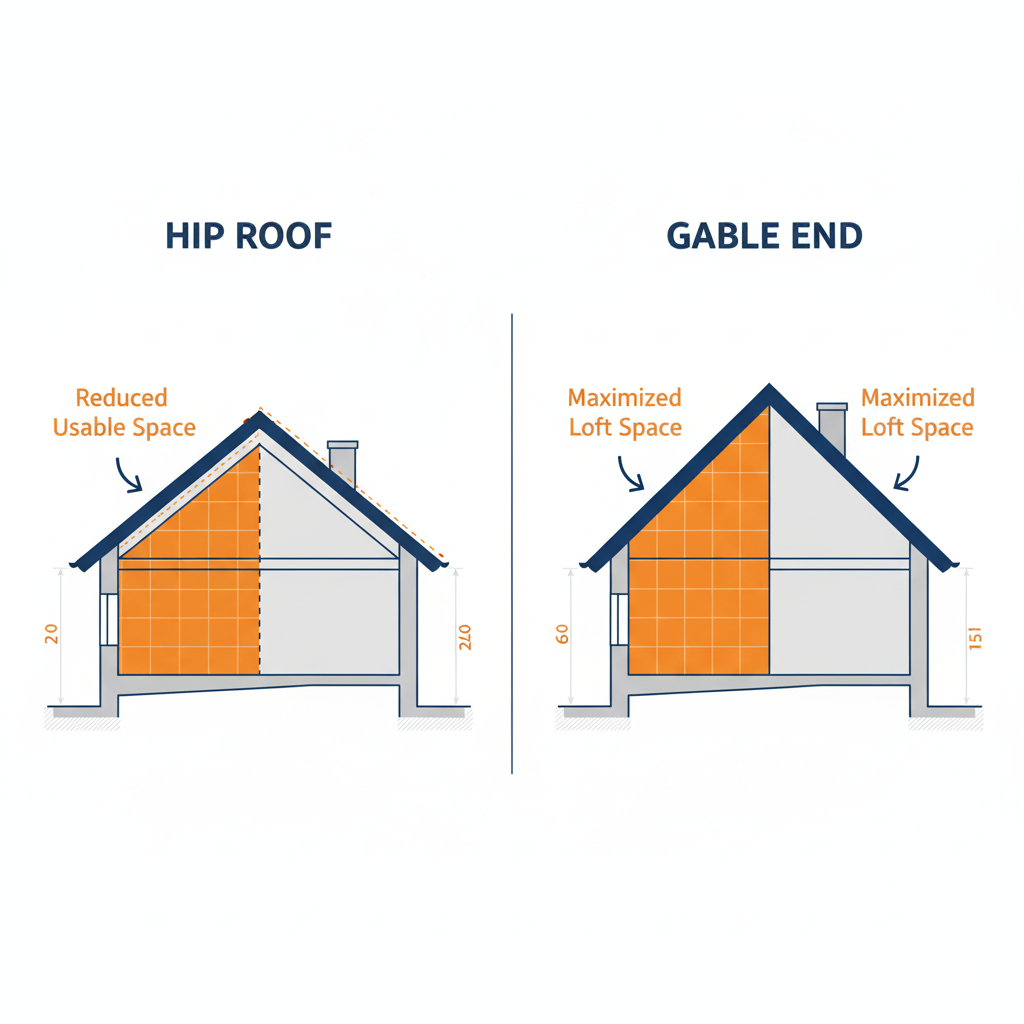
Most semi-detached houses built between 1920-1980 feature hip roofs on the side elevations. A hip roof slopes down on all four sides of the property, including the gable end which angles inward rather than rising vertically. This creates a characteristic triangular profile when viewed from the side but significantly reduces headroom and usable space in the loft.
A gable end, by contrast, has a vertical wall rising to the ridge, maximizing the full internal volume of the roof space. Hip-to-gable conversions transform the sloping hip into a vertical gable wall, typically gaining 8-15 square metres of additional usable floor space in the loft—often enough for an ensuite bathroom or generous built-in storage that wouldn’t fit with the hip configuration.
The Party Wall Trigger:
Hip-to-gable conversions trigger party wall requirements because they involve raising the height of an existing party wall. Here’s why:
- Existing Party Wall: In semi-detached properties, the wall between your house and your neighbor’s is a party wall—a shared structural element sitting astride the boundary line. This party wall typically rises to the ridge height of your existing hip roof.
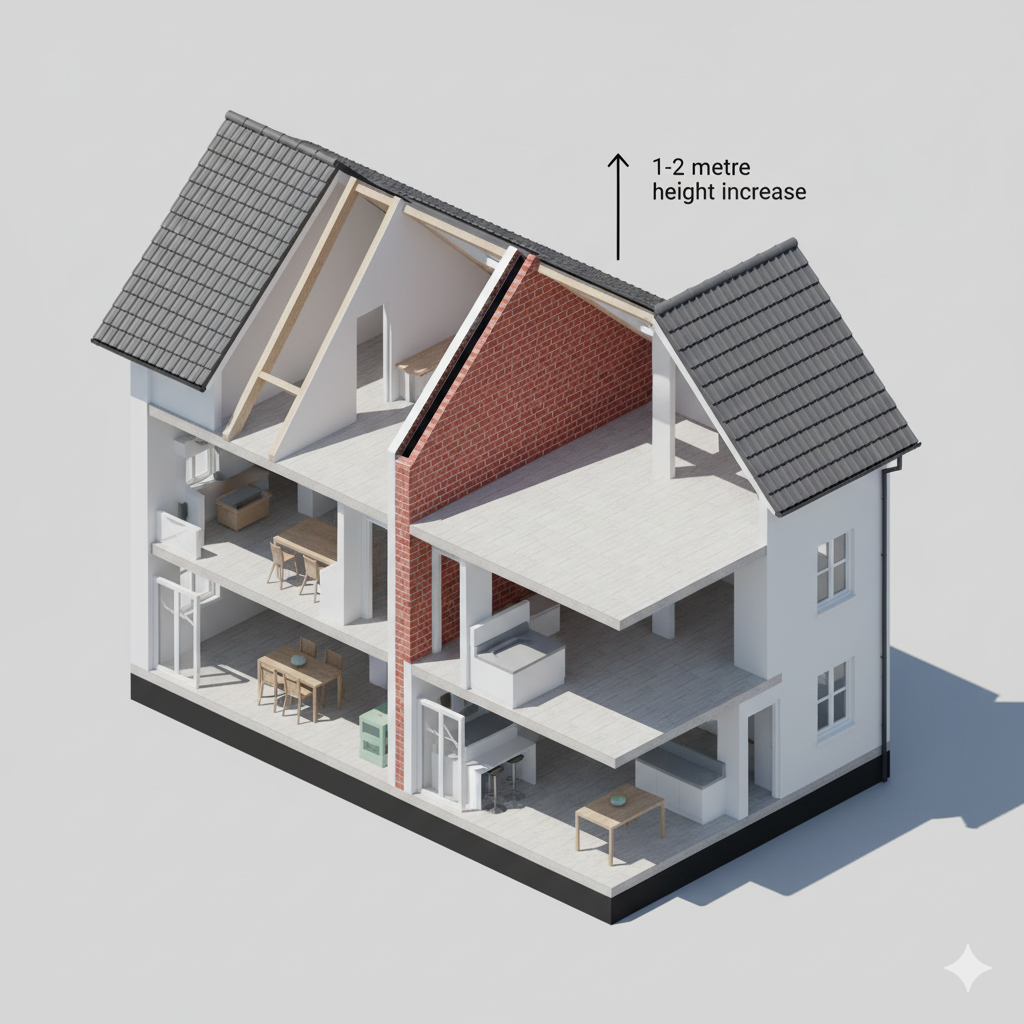
- Raising Required: To create the new gable end, the party wall must be raised an additional 1-2 metres (depending on your roof pitch and desired headroom). This extension of the party wall structure is considered “work to an existing party wall” under Section 2 of the Party Wall Act.
- Structural Alteration: You’re not just adding height—you’re altering the structural profile of the party wall from one that terminates at hip level to one that rises vertically and requires weatherproofing on the exposed gable face.
Section 2 Application:
Section 2 of the Party Wall etc. Act 1996 covers:
- 2(2)(a) – Underpinning, thickening, or raising a party wall
- 2(2)(e) – Cutting into a party wall
- 2(2)(m) – Exposing a party wall (previously covered)
Hip-to-gable conversions typically engage:
- 2(2)(a): Raising the party wall height by 1-2 metres
- 2(2)(e): Cutting into the party wall to tie in new roof structure
- 2(2)(m): Exposing the gable face of the party wall which was previously enclosed within both roof spaces
Typical Hip-to-Gable Scenario – Croydon 1930s Semi:
Your semi-detached house has a traditional hip roof. The party wall between you and your neighbor currently rises to approximately 5.5 metres (ground floor + first floor + roof structure to ridge). Your hip-to-gable conversion will:
- Raise the party wall an additional 1.8 metres to create a vertical gable end
- New party wall height: 7.3 metres
- Expose the gable face on your side (previously enclosed by your hip roof structure)
- Require weatherproofing and rendering the newly exposed gable wall
- Necessitate cutting into the party wall to anchor new roof timbers and steelwork
Party Wall Notice Required: Section 2(2)(a) notice must be served because you’re raising an existing party wall. The notice must be served at least two months before your intended start date (different from the one-month notice for Section 1 work or 14 days for Section 6 excavations).
Different Scenario – Mirror Hip-to-Gable:
Sometimes both semi-detached neighbors want hip-to-gable conversions simultaneously. In this case:
- Each must serve Section 2 notices on the other
- Coordination can reduce total party wall costs (shared surveyors possible)
- Construction can be phased or simultaneous (requires careful coordination)
- Single comprehensive Party Wall Award covering both projects possible
- Potential cost saving: 20-30% on surveyor fees if properly coordinated
Section 2 Party Wall Notice: Raising Party Wall Height Explained
Section 2 of the Party Wall Act governs all work to existing party structures. For hip-to-gable conversions, the primary concern is raising the height of the party wall.
What Section 2(2)(a) Covers – Raising Party Walls:
You have the right to raise the party wall, but this requires:
- Serving two months’ notice (minimum) before starting work
- Providing detailed engineering information about how the wall will be raised
- Following procedures agreed in the Party Wall Award
- Ensuring structural stability throughout the works
- Weatherproofing and making good all exposed surfaces
Technical Information Required in Section 2 Notices:
Hip-to-gable notices must include comprehensive construction details:
- Structural Engineer’s Calculations: Proving the existing party wall can support the additional height, or specifying strengthening works required
- Method Statement: How the party wall will be raised (brick-on-brick, blockwork, timber frame extension, etc.)
- Connection Details: How new structure will be anchored to existing party wall
- Roof Structure Plans: Steel beam positions, roof timber connections to party wall
- Weatherproofing Specification: How the exposed gable face will be protected (rendering, cladding, damp-proof course installation)
- Flashing and Drainage: How water will be managed at the party wall/roof junction
- Temporary Support: Any temporary propping or support during construction
- Timeline: Estimated start date and construction duration
The Two-Month Notice Period:
Unlike Section 1 (building on boundary – one month notice) or Section 6 (excavation – one month notice), Section 2 work requires two months’ notice. This extended period recognizes that work to existing party structures has more immediate impact on neighbors and requires more detailed review.
Timeline from notice service:
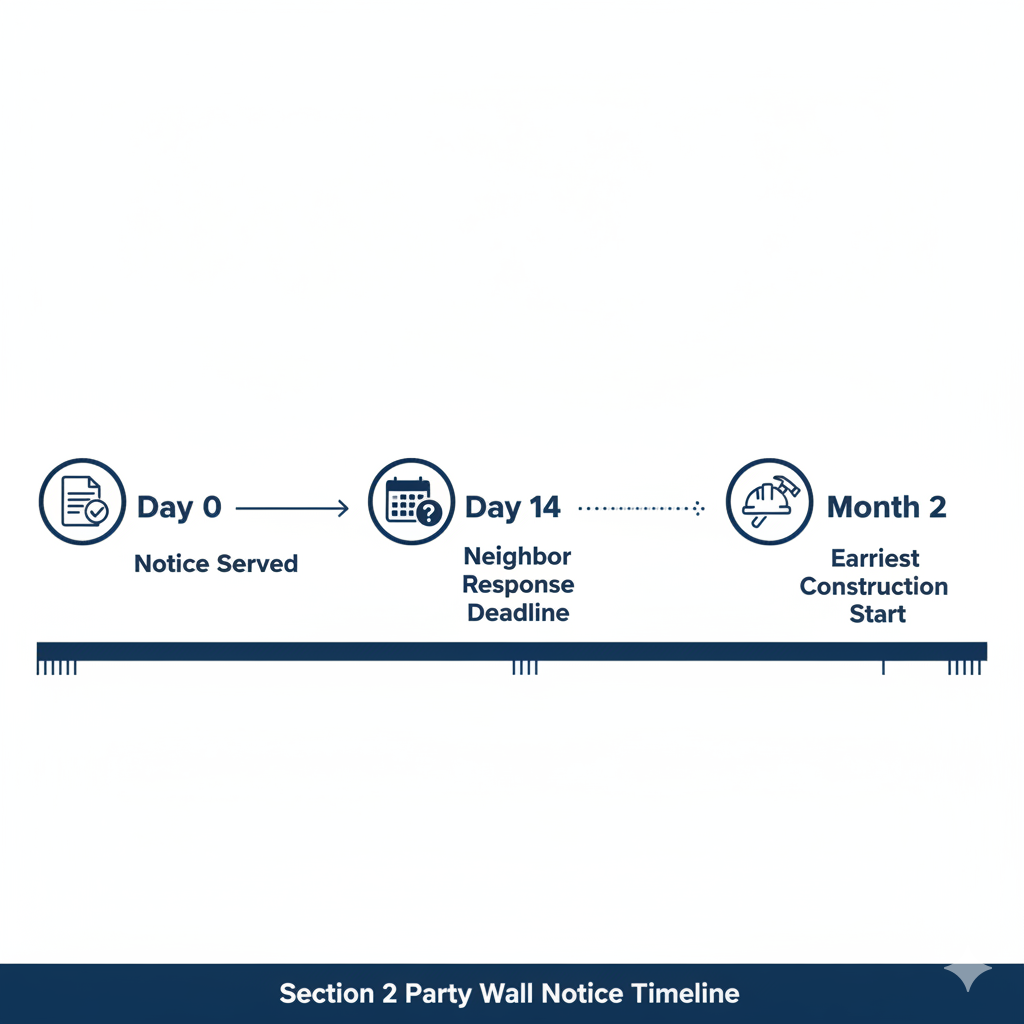
- Day 0: Serve Section 2 notice with technical information
- Day 14: Neighbor has 14 days to consent or dissent
- Month 2: Earliest you can start work (even if neighbor consented on day 1)
Common Misunderstanding: Some homeowners believe they can start 14 days after neighbor consent for Section 2 work. This is incorrect—the two-month notice period is statutory and applies regardless of neighbor response. Starting work on day 30 after serving a Section 2 notice is a breach of the Party Wall Act.
Do I need a party wall notice for a hip-to-gable loft conversion?
Often yes, because loft conversions commonly involve steel beams into a shared wall or work close to a neighbour’s structure.How long does the party wall process take for a loft?
Time depends on neighbour response. If they consent, it can be quick. If they dissent, surveyors agree an award before work starts.Can you handle the whole process for me?
Yes. A surveyor can guide notices, inspections, schedule of condition, and the party wall award, so your build stays legal and organised.
Party Wall Raising – Structural Considerations:
Raising a party wall 1-2 metres creates several structural challenges that surveyors will scrutinize:
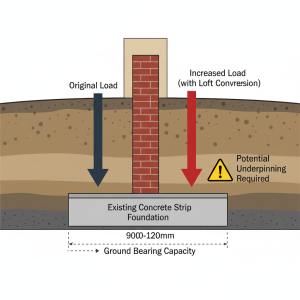
1. Foundation Capacity: The existing party wall foundations (typically 450-600mm wide, 900-1200mm deep for 1930s-1980s semis) were designed for the original wall height. Adding 1-2 metres of additional masonry adds significant load. Structural engineers must verify:
- Existing foundation adequate for increased load
- Ground conditions suitable (clay, sand, rock type affects bearing capacity)
- If inadequate, underpinning or foundation strengthening required
2. Wind Loading: A vertical gable end creates increased wind exposure compared to a hip roof. The party wall now acts as an exposed gable wall on your side, requiring:
- Wall ties to connect new raised section to existing party wall
- Potentially increased wall thickness at the raised section (215mm instead of 102.5mm)
- Lateral restraint straps connecting roof structure to party wall
3. Movement and Cracking:
Adding height to an existing wall can cause:
- Settlement as new load compresses existing foundations
- Differential movement between old and new masonry (different materials, curing times)
- Thermal expansion differences between exposed new gable and enclosed existing party wall
Party Wall Awards typically specify:
- Maximum allowable movement (5-10mm settlement)
- Crack monitoring requirements
- Remediation obligations if thresholds exceeded
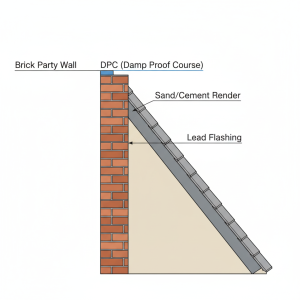
4. Weatherproofing the Raised Section:
The newly raised party wall section on your side becomes an exposed external gable wall requiring:
- Damp Proof Course (DPC): At the junction between existing party wall and new raised section
- Rendering/External Finish: Weather-resistant cladding on your side of the gable
- Flashing: Lead or similar flashing where your new roof meets the party wall
- Cavity Formation: If using cavity wall construction for the raised section
- Pointing: High-quality mortar pointing to prevent water ingress
Critical Party Wall Consideration: While you’re responsible for weatherproofing your side of the gable, any work that affects the neighbor’s side (even indirectly) must be addressed in the Party Wall Award. For example:
- If raising the party wall exposes your neighbor’s roof space to weather
- If your flashing installation requires access to neighbor’s roof
- If rendering your gable requires scaffolding over neighbor’s property
Weatherproofing Requirements and Party Wall Implications
One of the most distinctive aspects of hip-to-gable party wall procedures is the weatherproofing requirement. Unlike dormers (where the party wall remains within both roof spaces) or rear extensions (where external walls are typically not party walls), hip-to-gable creates an exposed external surface on what is legally a party structure.
The Weatherproofing Challenge:
When you convert your hip to a gable:
- Your side of the party wall becomes an external gable wall
- This surface is now exposed to wind, rain, and temperature variations
- Your neighbor’s side remains within their roof space (still has a hip roof)
- The party wall effectively has one “external” face (yours) and one “internal” face (theirs)
Party Wall Act Obligations:
Section 2(2)(n) of the Party Wall Act addresses this: you must “make good, point and render” any parts of the party wall exposed by your works. This means:
Your Responsibilities:
- Weatherproof your side of the gable wall (rendering, cladding, or other weather-resistant finish)
- Install appropriate damp proof course at the junction between old and new work
- Ensure flashing and drainage prevent water penetration
- Maintain weatherproofing in good condition permanently
What the Party Wall Award Typically Specifies:
- Render Specification:
- Type of render (traditional sand/cement, modern polymer-based, lime render for period properties)
- Thickness (typically 15-20mm)
- Finish type (smooth, textured, painted)
- Color (some neighbors request specific colors to maintain uniformity, though this is not usually within surveyors’ remit)
- Damp Proof Course:
- Location (at junction between existing party wall and new raised section)
- Type (DPC membrane, lead tray, proprietary DPC system)
- Laps and connections to existing DPC in party wall
- Flashing:
- Lead flashing (Code 4 or Code 5 lead typically specified)
- Minimum upstand (150mm above roof covering)
- Connection method (stepped flashing, continuous flashing)
- Dressed into brickwork or sealed with mastic
- Inspection Requirements:
- Surveyor inspection before rendering (to verify masonry quality)
- Inspection of flashing installation
- Final inspection after weatherproofing complete
Common Weatherproofing Issues:
Issue #1: Neighbor Wants Matching Finish
Sometimes neighbors request that your rendered gable match their property’s external finish. However:
- Party Wall Act does not give neighbors control over your design choices
- Planning permission determines acceptable external finishes
- Surveyors focus on weatherproofing adequacy, not aesthetic preference
- Reasonable requests (e.g., neutral color, traditional materials in conservation areas) may be accommodated as goodwill gestures
Issue #2:
Scaffolding and access (what the Act covers and what it doesn’t)
Some hip-to-gable builds need scaffolding to finish the new gable face. The Party Wall Act includes access rights in some situations, but access arguments often happen because scaffolding is about external finishes, not the shared wall itself.
Best approach:
-
raise access early (before notice goes in)
-
offer protection for their garden/roof and clear dates for scaffold up/down
-
if needed, agree a separate scaffold licence in writing
The government guide also says access rights usually need 14 days’ notice (except emergencies).
Issue #3: Water Penetration from New Gable
If your weatherproofing fails and water penetrates the party wall:
- You’re liable for damage to your neighbour’s property
- Party Wall Award usually specifies that weatherproofing must be maintained indefinitely
- The neighbour can claim for internal damage (ceiling staining, mould, structural damage)
- Your buildings insurance should cover this (ensure party wall works are declared)
Issue #4: Temperature Differential
Your exposed gable face experiences temperature variations (-5°C to +30°C UK range). Your neighbour’s side remains at loft space temperature (typically 5-15°C year-round). This differential can cause:
- Thermal movement in the party wall
- Cracking at the junction between old and new work
- Render failure if the wrong type is used
Solution: Modern breathable render systems designed for exposed locations perform better than traditional sand/cement. Discuss with structural engineer and specify in Party Wall Award.
Best Practice Weatherproofing Sequence:
- Raise Party Wall: Build new masonry/blockwork to required height
- Install DPC: At junction, ensuring continuity with existing DPC
- Build Roof Structure: Fix roof timbers and steelwork to party wall
- Install Flashing: Before roofing completion, ensuring water cannot penetrate behind
- Apply External Render: After roof is weathertight, preventing water getting behind render
- Inspection: Surveyor confirms weatherproofing adequate before scaffolding removal
Timeline: Weatherproofing phase typically takes 2-3 weeks within the overall 8-12 week loft conversion timeline.
Party Wall Surveyor Costs for Hip-to-Gable Conversions
Hip-to-gable loft conversions fall into the mid-range for party wall costs—more than simple dormers but significantly less than basements or complex multi-story extensions.
Typical Fee Structure:
Building Owner’s Surveyor (Your Surveyor):
- Award Preparation and Management: £450-£700
- Review structural engineer’s drawings and calculations
- Prepare detailed Party Wall Award with hip-to-gable specific conditions
- Coordinate Schedule of Condition for neighbor’s property
- Liaise with adjoining owner’s surveyor throughout
- 3-4 site visits (initial, mid-construction, pre-weatherproofing, completion)
Adjoining Owner’s Surveyor (Neighbor’s Surveyor – You Pay):
- Per Neighbor: £400-£600
- Award negotiation and agreement
- Schedule of Condition (photographic survey of neighbor’s loft space, bedrooms below, ceilings)
- Review of structural methodology
- Monitoring during party wall raising phase
- Sign-off inspection after weatherproofing
Cost Scenarios:
Scenario 1: Standard Semi-Detached (One Neighbor Affected)
- Your surveyor: £550
- Neighbor’s surveyor: £500
- Total: £1,050
Scenario 2: End-of-Terrace with Hip Roof (One Neighbor Affected)
- Your surveyor: £500
- Neighbor’s surveyor: £450
- Total: £950
Scenario 3: Mid-Terrace with Hip Roofs (Two Neighbors Potentially Affected)
- Typically only one neighbor shares the party wall being raised
- If both sides have party walls being raised: £1,400-£1,800 total
- Usually: £950-£1,200 (one neighbor)
Scenario 4: Mirror Hip-to-Gable (Both Neighbors Converting Simultaneously)
- Potential for agreed surveyor arrangement
- Shared Schedule of Condition costs
- Coordinated Award covering both projects
- Cost per property: £600-£800 (saving 20-30% vs separate projects)
Why Hip-to-Gable Costs Less Than Basements But More Than Dormers:
Compared to Dormers (£600-£900 typical):
- ✅ Hip-to-gable raises party wall significantly (more structural review)
- ✅ Weatherproofing requirements need specification and inspection
- ✅ Foundation capacity assessment required
- ✅ Higher impact on neighbor’s property (exposed gable, increased height)
Compared to Basements (£2,500-£5,000+ typical):
- ❌ No underpinning required
- ❌ No excavation within 3 metres triggering Section 6
- ❌ No monitoring equipment (crack studs, level surveys) needed
- ❌ No security deposits (escrow) typically required
- ❌ Shorter construction duration (8-12 weeks vs 6-12 months)
Regional Variations:
London and Southeast:
- Central London (Zones 1-2): £900-£1,400
- Outer London (Zones 3-6): £800-£1,200
- Home Counties (Surrey, Kent, Essex): £750-£1,100
Midlands and North:
- Birmingham, Manchester, Leeds: £700-£1,000
- Smaller cities: £650-£900
- Market towns: £600-£850
Cost-Increasing Factors:
- Listed Buildings: +£200-£400 (specialist heritage surveyor needed)
- Conservation Areas: +£100-£250 (additional documentation)
- Complex Roof Structures: +£150-£300 (if existing roof has unusual framing requiring detailed analysis)
- Contentious Neighbors: +£200-£500 (extended negotiations, additional correspondence)
- Both Neighbors Affected: +£500-£800 (second neighbor’s surveyor plus additional coordination)
Payment Timing and Cash Flow:
- Your Surveyor:
- 50% on appointment (£225-£350)
- 50% on Award completion (£225-£350)
- Total upfront before construction: £450-£700
- Neighbor’s Surveyor:
- Typically invoiced in full after Award completion
- Sometimes final invoice after project completion
- Budget for payment within first 4-6 weeks
Total Party Wall Cash Flow:
- Month 1-2: Pay your surveyor’s full fee plus neighbor’s surveyor fee
- Total upfront party wall costs: £900-£1,300
- Compare to total loft conversion cost: £35,000-£55,000 typical hip-to-gable project
- Party wall fees: 2-3% of total project cost
Can You Reduce Costs?
Agreed Surveyor Option: If your neighbor agrees, appoint a single “agreed surveyor” representing both parties:
- Potential total fee: £650-£900 (saving £200-£400)
- However: Neighbors often prefer independent representation for raising party wall projects
- Works best for mirror hip-to-gable scenarios where both converting
DIY Notices (Not Recommended for Hip-to-Gable): While legally possible to serve your own Section 2 notices:
- Hip-to-gable requires complex technical information (structural calculations, weatherproofing specs)
- Incorrectly drafted notices cause delays (re-serving required)
- If neighbor dissents, you need a surveyor anyway
- Potential saving: £200-£300
- Risk: Delays costing £1,000-£3,000 in contractor standdown time
Recommendation: For hip-to-gable conversions, appoint a qualified Pyramus and Thisbe Club party wall surveyor from the outset. The £450-£700 investment ensures proper documentation, reduces dispute risk, and provides professional project management worth far more than the fee.
Complete Party Wall Timeline for Hip-to-Gable Loft Conversions
Hip-to-gable conversions have a moderately extended party wall timeline compared to simpler projects, primarily due to the two-month notice requirement for Section 2 work.
Week -10 to -8 (Pre-Notice Preparation):
- Finalize Design: Complete architectural drawings showing new gable end, internal layout, roof structure
- Structural Engineering: Obtain structural calculations for:
- Party wall raising (load assessment, foundation capacity)
- Steel beams and roof structure
- Connection details to existing party wall
- Any strengthening required
- Planning Permission: Obtain planning consent or confirm permitted development rights
- Note: Hip-to-gable often requires planning permission (exceeds permitted development in many cases)
- Allow 8-12 weeks for planning decision
- Appoint Building Owner’s Surveyor: Engage your party wall surveyor early for notice preparation advice
- Prepare Technical Package: Assemble all information required for Section 2 notice
Week -8 (Notice Service):
- Serve Section 2 Party Wall Notice: Formal notice to neighbor(s) sharing the party wall
- Notice Must Include:
- Detailed structural drawings showing party wall raising
- Structural engineer’s calculations and specifications
- Weatherproofing methodology
- Connection details for roof structure to party wall
- Estimated start date (must be at least 2 months after notice service)
- Building owner’s details and your surveyor’s contact information
- Proof of Service: Retain evidence (recorded delivery, signed acknowledgment, email with read receipt)
Week -7 to -6 (Response Period and Surveyor Appointment):
- 14-Day Response Window: Neighbor has 14 days from notice service to respond
- If Neighbor Consents: You must still wait the full two months before starting work. Consent does not shorten the statutory two-month notice period for Section 2 work.
- If Neighbor Dissents or No Response: They must appoint a surveyor within 10 days of dissenting, or you appoint on their behalf if they fail to respond.
- Surveyor Exchange: Your surveyor and neighbor’s surveyor exchange details and begin Award negotiations (typically within 3-5 days of appointments)
Important Legal Note: The two-month notice period for Section 2 work is statutory under the Party Wall etc. Act 1996 and cannot be waived or shortened, even with neighbor agreement. Starting construction before the two-month period expires is a breach of the Act, regardless of whether the neighbor has given written consent. This extended period (compared to one month for Section 1 or 14 days for Section 6) reflects the significant impact that work to existing party structures has on neighbors.
Disclaimer: This timeline information is provided for general guidance only. Actual timelines may vary based on neighbor responsiveness, surveyor availability, project complexity, planning permission requirements, and individual circumstances. Always consult with qualified Pyramus and Thisbe Club party wall surveyors for timeline advice specific to your hip-to-gable project.
Week -6 to -2 (Award Preparation and Negotiation):
- Schedule of Condition Arranged: Neighbor’s surveyor schedules inspection of neighbor’s property
- Comprehensive Survey Required:
- Loft space (particularly area near party wall)
- Bedrooms on first floor (below loft, vulnerable to vibration during party wall raising)
- Ceilings (mapping existing cracks that might widen)
- External inspection of neighbor’s hip roof
- 2-3 hours typically for thorough semi-detached survey
- Award Negotiation: Surveyors agree on:
- Working hours (8am-6pm Monday-Friday, 8am-1pm Saturday typical)
- Weatherproofing specification and inspection requirements
- Access provisions (if scaffolding needs to overhang neighbor’s property)
- Protection measures during construction
- Notification requirements (when party wall raising begins)
- Foundation assessment results and any strengthening required
- Maximum allowable movement/settlement (if applicable)
- Award Issued: Party Wall Award document prepared and served on all parties
- Typical Duration: 3-5 weeks for Award completion from notice service (faster than basements, similar to rear extensions)
Week 0 (Construction Start):
- Earliest Possible Start: Cannot begin construction until:
- Two months have elapsed since serving Section 2 notice (statutory requirement)
- Party Wall Award is finalized and issued (if neighbor dissented)
- Schedule of Condition is complete
- Building Regulations approval obtained (separate from party wall)
- Notify Surveyors: Inform both surveyors of your actual start date (usually required 7 days in advance as specified in Award)
- Pre-Start Meeting: Some Awards require pre-construction meeting between contractor and surveyors to confirm methodology
Week 1-3 (Strip Existing Roof and Party Wall Raising):
- Hip Roof Removal: Strip existing hip roof tiles and timbers on your side
- Party Wall Raising Begins:
- Build new masonry/blockwork on top of existing party wall
- Height increase typically 1-2 metres
- Sequential construction (not all at once) to maintain stability
- Install DPC at junction between old and new work
- Surveyor Site Visits:
- Initial visit: Verify foundation capacity confirmed before loading (Week 1)
- Mid-raising visit: Check construction quality, bonding, verticality (Week 2-3)
- Critical Phase: This is when neighbor is most affected (noise, vibration, temporary loss of weather protection)
Week 4-8 (Roof Structure and Weatherproofing):
- Steel Beams Installed: Ridge beam and any supporting steelwork fixed to party wall
- Roof Timbers: New roof structure built and connected to raised party wall
- Roofing Completion:
- Felt, battens, tiles installed
- Flashing installed where roof meets party wall
- Building becomes weathertight
- External Gable Weatherproofing:
- Render applied to your side of raised party wall (or alternative cladding)
- Inspection by surveyor before rendering (Week 5-6)
- DPC verified at all junctions
- Surveyor Visits:
- Pre-weatherproofing inspection (Week 5)
- Post-weatherproofing inspection (Week 8)
Week 9-12 (Internal Fit-Out):
- Dormer/Windows Installation: (if part of design)
- Insulation and Plasterboard: Internal finishes applied
- Staircase: Loft staircase installed
- First Fix: Electrical, plumbing rough-ins
- Second Fix: Lighting, radiators, bathroom fittings (if ensuite)
- Minimal Party Wall Involvement: Surveyors typically not involved during fit-out unless issues arise
Week 12-13 (Practical Completion):
- Building Control Final Inspection: Separate from party wall procedures
- Party Wall Final Inspection: Both surveyors conduct completion inspection
- Schedule of Condition Comparison: Review against baseline to identify any damage
- Defect Identification: Any cracks, settlement, or damage documented
- Remedial Works: If minor damage occurred (rare but possible):
- Fill and repaint cracks in neighbor’s ceilings
- Re-fix loose ceiling cornices
- Touch up any cosmetic damage
- Sign-Off: Surveyors issue completion certificates, formally ending party wall obligations
Week 13+ (Post-Completion):
- Final Invoices: Any remaining surveyor fees invoiced
- Document Retention: Keep all party wall documents with property deeds:
- Original Section 2 notice
- Party Wall Award
- Schedule of Condition (photos)
- Completion certificates
- All surveyor correspondence
- Future buyers will want to see complete party wall documentation
Total Timeline Summary:
- Fastest Possible: 5 weeks notice + 12 weeks construction = 17 weeks total
- Typical: 6-7 weeks notice + 12-14 weeks construction = 18-21 weeks total
- If Contentious: 8-10 weeks notice + 12-14 weeks construction = 20-24 weeks total
Comparison to Other Projects:
- Standard Dormer Loft: 14-16 weeks total (faster notice period, simpler construction)
- Hip-to-Gable: 18-21 weeks total (extended notice period, party wall raising complexity)
- Basement Extension: 24-36 weeks total (extensive party wall procedures, longer construction)
Critical Path Management:
For hip-to-gable conversions, party wall procedures are often NOT the critical path if managed properly. The critical path is usually:
- Planning Permission: 8-12 weeks (if required)
- Building Regulations Approval: 6-8 weeks
- Structural Engineer Design: 3-4 weeks
- Contractor Availability: 4-12 weeks lead time
Recommended Strategy: Start party wall procedures immediately after planning permission is granted (or confirmed as permitted development). This allows the two-month notice period to run concurrently with Building Regulations approval and contractor scheduling, so the Award is ready when your contractor is available.
Common Timeline Mistakes:
- Confusing Section 2 with Section 1 Notice Periods: Section 2 requires TWO months, not one month. Starting after one month is a breach.
- Assuming Consent Shortens Notice Period: Even with immediate neighbor consent, you cannot start before two months have elapsed.
- Not Allowing for Surveyor Coordination: Schedule of Condition for loft spaces requires neighbor availability—can take 2-3 weeks to coordinate, especially if neighbor is away or busy.
- Underestimating Award Negotiation Time: Hip-to-gable Awards involve technical specifications (weatherproofing, structural connections) requiring more negotiation than simple dormers.
- Starting Before Building Regulations Approval: Some homeowners get Party Wall Award ready but forget they also need Building Regulations approval before starting work.
Semi-Detached Property Specific Considerations
Hip-to-gable conversions are predominantly a semi-detached house feature, and these property types have unique party wall characteristics that differ from terraces.
Semi-Detached vs Terrace Party Wall Differences:
Semi-Detached Properties:
- Typically have ONE party wall (shared with the adjoining semi)
- Only ONE neighbor affected by party wall procedures
- Party wall often structural load-bearing for both properties
- More substantial party wall construction (typically 225mm solid brick or 275mm cavity)
- Roof structures often interdependent (mirrored hip roof designs)
Terraced Properties:
- Have TWO party walls (both sides)
- TWO neighbors potentially affected (though hip-to-gable usually only one side)
- Party walls typically thinner (102.5-215mm)
- More independent roof structures
Structural Interdependency in Semis:
1930s-1980s semi-detached properties were often built with interdependent roof structures:
- Mirrored Hip Roofs: Both semis have identical hip roofs, with party wall rising to central ridge
- Shared Ridge: Ridge beam or ridge board may be continuous across both properties
- Butterfly Roof Structure: Valley gutter between properties at ridge level (less common but exists)
When you convert your hip to a gable, you’re altering this structural relationship:
Potential Impacts on Neighbor:
- Load Redistribution: Your new gable end structure changes how loads transfer through the party wall. Structural engineer must verify neighbor’s roof structure remains adequately supported.
- Weather Exposure: Your neighbor’s hip roof was previously protected by your hip. Now they have an exposed gable end immediately adjacent (though still within their roof space, it’s closer to weather elements).
- Visual Impact: While party wall procedures don’t address aesthetics, neighbors often feel your gable “looms over” their property, creating relationship sensitivities.
- Future Restrictions: If your neighbor later wants a hip-to-gable conversion, your existing gable may affect their design options (roof pitch matching, flashing complications, etc.).
Party Wall Award Provisions for Semi-Detached:
Awards for semi-detached hip-to-gable projects typically include:
1. Structural Protection Clauses:
- Your structural engineer must verify neighbor’s roof structure remains stable
- Any temporary support required during your works must be specified
- If your works require temporary propping through party wall into neighbor’s loft, this must be agreed and access arranged
2. Weatherproofing Guarantees:
- You must weatherproof your gable end to prevent water penetration affecting neighbor
- Flashing installation must not allow water to run onto neighbor’s roof
- Render or cladding must be maintained in good condition indefinitely
3. Future Conversion Rights:
- Awards sometimes include provisions allowing neighbor to convert their hip to gable in future
- Your gable weatherproofing must not prevent neighbor’s future works
- If both parties express interest in hip-to-gable, coordinated approach can save 20-30% on party wall costs
4. Access for Maintenance:
- You may need occasional access to neighbor’s loft space to inspect/maintain your weatherproofing
- Awards can specify access rights (with reasonable notice) for this purpose
Case Study: Croydon 1930s Semi-Detached Hip-to-Gable
Property Details:
- 1935-built semi-detached house
- Hip roof on both semis
- Party wall: 225mm solid brick, rising 5.5m to ridge
- Planning permission granted for hip-to-gable loft conversion
Party Wall Process:
- Section 2 notice served: September 1st
- Neighbor initially concerned about:
- Whether their roof structure would be affected
- Water penetration from new gable
- Loss of symmetry between the semis
- Both neighbors appointed surveyors (October 5th)
- Award negotiation: 4 weeks
- Key Award provisions:
- Structural engineer’s confirmation neighbor’s roof unaffected
- Weatherproofing specification: sand/cement render to BS EN 13914
- Flashing: Code 4 lead with 150mm upstand
- Working hours: 8am-6pm Mon-Fri, 8am-1pm Sat
- Access rights for future maintenance inspections
Award completed: October 31st Construction start: November 5th (just over 2 months from notice) Party wall raising: November 5-20 (3 weeks) Weatherproofing complete: December 10th Final inspection: January 15th (post-settlement monitoring) Sign-off: January 20th
Total party wall costs:
- Building owner’s surveyor: £575
- Adjoining owner’s surveyor: £525
- Total: £1,100
Outcome: No damage to neighbor’s property, successful conversion, neighbor now considering their own hip-to-gable conversion and has asked for recommendations based on positive experience.
Weatherproofing Details: The Critical Party Wall Element
Weatherproofing deserves special attention in hip-to-gable party wall procedures because it’s the most common source of post-completion disputes.
Why Weatherproofing Causes Disputes:
- Long-Term Obligation: Unlike most party wall matters that end at completion, weatherproofing is an indefinite obligation. Render failure 5 years later still creates party wall liability.
- Difficult to Assess Quality: Weatherproofing effectiveness isn’t immediately apparent. Problems may not manifest for months or years (after first winter, after thermal cycling, after frost damage).
- Maintenance Requirements: Render cracks, flashing degrades, pointing erodes. Ongoing maintenance is required but often neglected.
- Multiple Failure Points: Water can penetrate via:
- Render cracks
- DPC failure
- Flashing inadequacy
- Pointing degradation
- Connection failures between old and new work
Party Wall Award Weatherproofing Specifications:
1. Render Specification:
Traditional Sand/Cement Render:
- Mix: 1:3 cement:sharp sand with plasticizer
- Thickness: 15-20mm applied in two coats
- Finish: Scratched first coat, smooth or textured second coat
- Cure time: Minimum 7 days before painting
- Pros: Durable, proven, economical (£30-£45 per sqm)
- Cons: Prone to cracking with thermal movement, requires painting
Modern Polymer-Based Render:
- Through-colored render (no painting required)
- Flexible formulation reduces cracking
- Water-resistant but breathable
- Pros: Superior weather resistance, minimal maintenance, color-fast
- Cons: More expensive (£60-£90 per sqm), requires specialist application
Lime Render (Heritage/Conservation):
- Traditional lime putty and sand mix
- Breathable, allows moisture movement
- Required for some listed buildings/conservation areas
- Pros: Period-appropriate, flexible, self-healing minor cracks
- Cons: Expensive (£70-£100 per sqm), longer cure time, specialist application
Award Typically Specifies:
- Render type and mix specification
- Application method (hand-applied, spray-applied)
- Thickness and number of coats
- Curing/drying time before painting (if applicable)
- Color (sometimes—usually just “decorative finish to match existing” or “neutral color”)
2. Damp Proof Course (DPC) Installation:
DPC is critical at the junction between existing party wall and new raised section:
Cavity Tray Method:
- Proprietary cavity tray DPC installed in course of brickwork
- Projects beyond external face of wall
- Weep holes at 900mm centers to allow moisture escape
- Connects to existing DPC in party wall (if cavity wall construction)
Lead Tray Method:
- Code 4 or Code 5 lead sheet
- Minimum 150mm laps at joints
- Dressed over external face with drip detail
- Traditional method, very durable
Award Specifies:
- DPC type and specification
- Location (must be at junction, typically 150mm above new roof level)
- Connection to existing DPC
- Inspection requirement before covering (surveyor must inspect before rendering proceeds)
3. Flashing Installation:
Where your new roof meets the raised party wall, flashing is essential:
Lead Flashing Specification:
- Code 4 Lead: Minimum (3mm thick, suitable for most residential)
- Code 5 Lead: Preferred for high exposure sites (4mm thick, more durable)
- Minimum Upstand: 150mm above roof covering (tiles/slates)
- Dressed Into: Brickwork (cut chase, point with mortar) or sealed with lead sealant
- Soakers: Individual lead soakers under each tile/slate at abutment
- Step Flashing: If party wall runs at angle to roof pitch
Common Flashing Failures:
- Inadequate upstand (less than 150mm allows wind-driven rain penetration)
- Poor pointing (water penetrates behind flashing)
- No soakers (water runs under tiles into roof space)
- Thermal movement causing separation (lead expands/contracts with temperature)
Award Requires:
- Flashing specification (Code 4/5, dimensions, installation method)
- Surveyor inspection before roofing completion (to verify flashing in place)
- Weathertightness test if possible (water test or visual inspection during rain)
4. Maintenance Obligations:
Party Wall Awards for hip-to-gable conversions typically include ongoing maintenance clauses:
Your Obligations (Indefinite):
- Maintain weatherproofing in good condition
- Repair render cracks promptly (within 3 months of notification)
- Replace failed flashing if necessary
- Repaint render if required to maintain weather resistance
- Allow neighbor’s surveyor access (with reasonable notice) to inspect weatherproofing condition
Neighbor’s Rights:
- Notify you of weatherproofing defects
- Request remedial works if deterioration evident
- Claim for damage if water penetration occurs due to your weatherproofing failure
- In extreme cases, undertake emergency repairs and recover costs from you
Best Practice:
- Inspect your gable weatherproofing annually (spring, after winter weather)
- Address minor cracks immediately (£100-£200 for touch-up vs £2,000-£5,000 for full remedial works)
- Keep photographic record of weatherproofing condition
- Notify buildings insurance of party wall weatherproofing obligation
5. Inspection and Sign-Off Process:
Pre-Weatherproofing Inspection (Critical):
- Surveyor inspects raised party wall before rendering
- Checks: brickwork quality, DPC installation, mortar joints, verticality
- Photos taken for record
- Must happen before rendering covers the masonry—no second chance
Post-Weatherproofing Inspection:
- Surveyor inspects completed render, flashing, all junctions
- Checks: render thickness, coverage, no gaps, proper curing, flashing installed correctly
- Weather resistance assessed (visual inspection, sometimes water spray test)
- Defects noted for remediation before sign-off
Sign-Off Requirements:
- Weatherproofing must be complete and satisfactory
- Any defects must be remedied
- Photographs of completed works for permanent record
- Surveyor issues certificate confirming weatherproofing adequate
- This certificate protects you if neighbor later claims pre-existing defects
Common Weatherproofing Defects Found at Inspection:
- Inadequate Render Thickness: Less than 15mm (weak, prone to cracking)
- Poor Render Key: Doesn’t adhere properly to brickwork (will delaminate)
- Missed Areas: Small patches not rendered (common at top of gable near ridge)
- Flashing Too Short: Less than 150mm upstand (will allow water penetration)
- Poor Pointing Behind Flashing: Gaps allowing water behind lead
- No Soakers: Missing individual soakers under tiles (water ingress certain)
- DPC Not Visible: Should project beyond render face—if not visible, possibly not installed correctly
Remediation Timeline: If defects found: 2-4 weeks typically to remedy, then re-inspection. This is why allowing time between weatherproofing and final sign-off is prudent.
Common Issues and How to Prevent Them
Issue #1: Foundation Capacity Concerns
Problem: Structural engineer’s assessment reveals existing party wall foundations are inadequate for the additional 1-2 metres of masonry height. Underpinning or strengthening required, significantly increasing costs and complexity.
Prevention:
- Commission foundation assessment BEFORE finalizing hip-to-gable design
- Trial pit or inspection of existing foundations (£400-£800)
- If inadequate, consider:
- Lightweight construction for raised section (timber frame instead of masonry)
- Strengthening existing foundations (£1,500-£3,000 per linear metre)
- Alternative loft conversion design (dormer instead of gable)
Resolution if issue occurs:
- Foundation works trigger additional party wall procedures
- Revised Party Wall Award required
- Costs increase £5,000-£15,000+ for underpinning
- Timeline extended 4-8 weeks for foundation works
Issue #2: Neighbor Objects to Gable Appearance
Problem: Neighbor dislikes the appearance of your gable end, claiming it’s unsightly, ruins symmetry, or devalues their property. They attempt to use party wall process to force design changes.
Prevention:
- Show neighbor your planning-approved drawings before serving party wall notice
- Explain that planning authority has already assessed design appropriateness
- Emphasize high-quality materials (matching bricks, good quality render)
- Consider goodwill gesture (offer to paint your gable a neutral color that complements their property)
Resolution if issue occurs:
- Party wall surveyors will confirm that design aesthetics are outside their remit
- Party Wall Act does not give neighbors control over your design (planning permission does)
- Surveyors focus on: structural safety, weatherproofing adequacy, construction methodology
- Appearance/aesthetics are planning matters already resolved
- Stand firm on your approved design
Issue #3: Weather Damage During Construction
Problem: During party wall raising phase, your hip roof is removed but new gable not yet weatherproof. Heavy rain damages neighbor’s loft space (water penetration through temporarily exposed party wall or inadequate temporary protection).
Prevention:
- Schedule party wall raising phase for drier months (April-September typically)
- Comprehensive temporary weather protection (tarpaulins, temporary roof covering)
- Party Wall Award should specify temporary protection requirements
- Contractor to have emergency tarpaulins ready if unexpected weather
- Monitor weather forecasts daily during critical phase
Resolution if issue occurs:
- You’re liable for damage caused by your works (even if weather-related)
- Immediate remediation: dry out neighbor’s loft, repair water damage
- Buildings insurance should cover (ensure party wall works declared to insurer)
- Typical costs if issue occurs: £1,500-£5,000 (drying, re-plastering ceilings, redecoration)
- Surveyor will document damage and verify repairs adequate
Issue #4: Settlement/Cracking in Neighbor’s Property
Problem: After completion, neighbor reports cracks in their ceilings or walls. Claim the additional load from raised party wall has caused settlement affecting their property.
Prevention:
- Comprehensive Schedule of Condition BEFORE works (photograph ALL existing cracks)
- Take your own photos as backup on day of Schedule inspection
- If foundation capacity marginal, consider monitoring studs (tell-tales) during construction
- Structural engineer’s certification that foundations adequate
Resolution if issue occurs:
- Compare claimed damage against Schedule of Condition photos
- Surveyors jointly inspect disputed cracks
- Analysis:
- Did cracks exist before (even if smaller)?
- Timeline: cracks appearing 6 months post-completion less likely related than cracks during construction
- Location: cracks in rooms far from party wall unlikely related
- If genuinely caused by your works: remediation required (fill, replaster, redecorate)
- If pre-existing or unrelated: photographic evidence from Schedule protects you
Typical settlement from party wall raising: 2-5mm (usually imperceptible). Cracks >0.5mm width require investigation.
Issue #5: Scaffolding Access Disputes
Problem: Your scaffolding needs to overhang neighbor’s property by 300-600mm to allow rendering your gable end. Neighbor refuses access or demands excessive compensation.
Prevention:
- Raise access requirements during initial party wall discussions (before serving notice)
- Section 8 of Party Wall Act provides limited access rights for party wall works
- However, external rendering arguably your works (not party wall works itself)
- Negotiate separate scaffold license agreement (£200-£500 for 2-3 weeks reasonable)
- Offer: liability insurance naming neighbor as additional insured, protection measures for their garden, prompt removal
Resolution if issue occurs:
- If neighbor refuses all access, alternative methods required:
- Render from your side only (using outriggers, longer scaffold boards)
- Mobile elevated work platform (MEWP/cherry picker) from street (no overhang needed)
- Hand-applied render from ladders (slower, more difficult, £300-£800 additional cost)
- Legal advice about Section 8 access rights may be required (expensive, last resort)
- Mediation often effective (neutral third party facilitates agreement)
Issue #6: Mirror Conversion Timing Disputes
Problem: Both you and your neighbor want hip-to-gable conversions. Dispute arises over who goes first, whether to coordinate, and how costs should be shared.
Prevention:
- Early discussion with neighbor about mutual interest
- Consider joint approach:
- Shared surveyors (agreed surveyor representing both)
- Coordinated Party Wall Award covering both projects
- Simultaneous or phased construction (requires excellent coordination)
- Cost sharing: each pays their own construction but split surveyor fees
- Potential saving: 20-30% on party wall costs if properly coordinated
Resolution if issue occurs:
- If you served notice first, you have priority (legal right to proceed)
- Neighbor must wait until your works complete before starting theirs
- However, goodwill approach: offer to coordinate if timing similar
- Joint surveyor appointment can work if both projects within 6 months
- Document all agreements in writing to prevent later disputes
Frequently Asked Questions: Hip-to-Gable Loft Conversions
Do I need party wall notice for a hip-to-gable loft conversion?
Almost always yes, for semi-detached properties. Hip-to-gable conversions trigger Section 2 of the Party Wall etc. Act 1996 because you’re raising the height of an existing party wall by 1-2 metres. This requires serving two months’ notice to your neighbor(s) sharing the party wall. The only exception would be if your loft conversion doesn’t involve raising the party wall height—extremely rare for true hip-to-gable conversions. For comprehensive information on all party wall requirements for loft conversions, see our detailed loft conversion guide.
How much does party wall cost for hip-to-gable conversion?
Typical costs for hip-to-gable loft conversions:
Standard Semi-Detached (One Neighbor):
- Your surveyor: £450-£700
- Neighbor’s surveyor: £400-£600
- Total: £850-£1,300
End-of-Terrace with Hip Roof:
- Your surveyor: £400-£650
- Neighbor’s surveyor: £350-£550
- Total: £750-£1,200
These fees cover Award preparation, Schedule of Condition, structural review, weatherproofing inspection, 3-4 site visits, and completion sign-off. Hip-to-gable costs more than simple dormers (£600-£900) due to party wall raising complexity and weatherproofing requirements. For detailed party wall cost breakdowns across all project types, see our comprehensive costs guide.
How long is the party wall notice period for hip-to-gable?
Two months minimum—significantly longer than other party wall work. Section 2 of the Party Wall Act requires TWO months’ notice for work to existing party structures (including raising party walls). This is different from:
- Section 1 (building on boundary): ONE month notice
- Section 6 (excavation): ONE month notice
- Section 2 (raising party wall): TWO months notice
Even if your neighbor consents immediately, you cannot start work before two months have elapsed from serving notice. This extended period reflects the significant impact that raising party walls has on the structure. Total party wall process typically takes 5-7 weeks from notice to Award completion.
Can my neighbor stop my hip-to-gable conversion?
No. Under the Party Wall etc. Act 1996, neighbors cannot prevent you from building a lawful hip-to-gable loft conversion. They can either:
- Consent to your Section 2 notice (process simplified but you still wait two months)
- Dissent and appoint a surveyor (party wall surveyors then agree an Award)
- Not respond (deemed dissent after 14 days, surveyor process begins)
In all cases, your project proceeds. Neighbors’ rights are to proper procedures, protection from damage, and having their surveyor costs covered—not to veto your conversion. If you have planning permission, the design has already been approved by the local planning authority. For more on your rights under the Party Wall Act, see our complete guide.
What’s the difference between hip-to-gable and dormer party wall requirements?
Hip-to-Gable:
- Raises party wall height 1-2 metres
- TWO months’ notice required
- More extensive structural review
- Weatherproofing specification critical
- Higher party wall costs: £850-£1,300
- 3-4 surveyor site visits
- Surveyor fees: 2-3% of project cost
Dormer Loft:
- Typically cuts into party wall but doesn’t raise it significantly
- ONE month notice usually sufficient (unless raising party wall for dormer)
- Standard structural review
- Weatherproofing less critical (dormers usually don’t expose party wall)
- Lower party wall costs: £600-£900
- 2-3 surveyor site visits
- Surveyor fees: 1.5-2.5% of project cost
Key Difference: Hip-to-gable fundamentally alters the party wall structure and exposes it to weather. Dormers typically work within existing roof space without extensively modifying the party wall itself.
Do I need planning permission AND party wall notice?
Yes, these are separate requirements:
Planning Permission:
- Controlled by local planning authority
- Assesses design impact on streetscape, neighbor amenity, conservation areas
- Hip-to-gable often DOES require planning permission (frequently exceeds permitted development limits)
- Timeline: 8-12 weeks for decision
Party Wall Notice:
- Private matter between you and neighbor
- Controlled by Party Wall etc. Act 1996
- Protects neighbor from construction damage
- Required regardless of whether you have planning permission or permitted development rights
- Timeline: Minimum 2 months notice + 3-5 weeks Award negotiation
Critical: You need planning permission (or confirmed permitted development) AND Party Wall Award before starting construction. Start party wall procedures after planning approval or PD confirmation.
Will raising the party wall damage my neighbor’s property?
Unlikely if done correctly, but possible: Raising a party wall adds load to existing foundations and can cause minor settlement. However:
Typical Outcome (95% of cases):
- No visible damage to neighbor’s property
- Any settlement within acceptable limits (2-5mm)
- Comprehensive Schedule of Condition protects both parties
- Professional construction prevents issues
Potential Issues (5% of cases):
- Minor ceiling cracks in neighbor’s bedrooms (typically <0.5mm width)
- Slight settlement causing doors to stick
- Cosmetic damage during construction (dust, vibration)
Your Protection:
- Structural engineer verifies foundation capacity before works
- Schedule of Condition documents pre-existing condition
- Buildings insurance covers damage caused by your works
- Party Wall Award specifies maximum allowable movement
Your Obligations:
- Repair any damage caused by your works
- Maintain proper construction methodology
- Follow Award conditions
- Weatherproof your gable to prevent water damage
Neighbor’s Protection:
- Schedule of Condition proves pre-existing condition
- Surveyor monitors works throughout
- Right to claim for repairs if damage occurs
- You pay their surveyor’s costs
What if both semi-detached neighbors want hip-to-gable conversions?
This is increasingly common and creates opportunities for cooperation and cost savings:
Coordinated Approach Benefits:
- Agreed Surveyor: One surveyor representing both parties (20-30% cost saving)
- Joint Award: Single comprehensive Award covering both projects
- Shared Schedule: One Schedule of Condition for the mirror properties
- Cost Sharing: Each pays construction but split surveyor fees (£400-£500 per property instead of £850-£1,300)
- Construction Efficiency: Coordinated timing reduces total disruption
Two Approaches:
1. Simultaneous Construction:
- Both convert at same time
- Shared scaffolding possible (significant cost saving)
- Party wall raising coordinated
- Weatherproofing both gables together
- Challenge: Requires finding contractors with capacity for both, perfect coordination
- Saving: 15-25% on total project costs
2. Phased Construction:
- One converts first (serves notice first has priority)
- Second converts 3-6 months later
- First project’s experience guides second
- Benefit: Less coordination stress, each focuses on their own project
- Cost: Modest saving (10-15%) compared to completely separate projects
Process:
- Both neighbors discuss intention early
- Joint meeting with single agreed surveyor
- Coordinated Section 2 notices (or sequential if phased)
- Single Award covering both projects (or linked Awards)
- Construction proceeds as agreed
What happens if you can’t agree:
- Whoever serves notice first has priority to proceed
- Second neighbor must wait until first project complete
- Each pays their own surveyors (no cost sharing)
- Separate Awards, separate processes
Recommendation: If both want hip-to-gable, invest 2-3 hours in coordination discussion. Potential saving of £2,000-£5,000 per property makes it worthwhile.
How is weatherproofing the gable end specified in the Party Wall Award?
The Party Wall Award will include detailed weatherproofing specifications because this is critical to preventing damage to the party wall structure:
Typical Award Provisions:
1. Render Specification:
- Type: Sand/cement mix (1:3 ratio) or modern polymer render
- Thickness: 15-20mm minimum
- Application: Two-coat system (scratch coat + finish coat)
- Finish: Smooth, textured, or through-colored
- Curing: Minimum 7 days before painting
2. Damp Proof Course:
- Location: Junction between existing party wall and new raised section
- Type: Proprietary cavity tray or Code 4 lead
- Installation: Before rendering proceeds
- Inspection: Surveyor must inspect before DPC is covered
3. Flashing:
- Material: Code 4 or Code 5 lead
- Upstand: Minimum 150mm above roof covering
- Installation: Dressed into brickwork with proper pointing
- Soakers: Individual lead soakers under tiles at abutment
4. Inspection Requirements:
- Pre-weatherproofing inspection (before rendering begins)
- DPC installation inspection (before covering)
- Flashing inspection (before roofing completion)
- Final weatherproofing inspection (after render complete)
5. Maintenance Obligations:
- Keep weatherproofing in good repair indefinitely
- Repair render cracks within 3 months of notification
- Allow neighbor’s surveyor access to inspect (with reasonable notice)
- Liable for damage if weatherproofing fails
Your Responsibility: The weatherproofing obligation is permanent. You must maintain your gable end weatherproofing for as long as you own the property (and it passes to future owners). Failure to maintain can result in liability for damage to the party wall and neighbor’s property.
What if I want to change from hip-to-gable to dormer during the process?
Design changes during party wall procedures are possible but have implications:
Before Serving Notice:
- No issue—simply serve notice for dormer instead of hip-to-gable
- Different party wall requirements (dormers typically simpler)
- Lower surveyor costs (£600-£900 vs £850-£1,300)
After Serving Notice But Before Award:
- Serve amended Section 2 notice with revised design
- Reset the two-month notice period (starts again from amended notice)
- Surveyors may charge additional fees for reviewing new design (£100-£200)
- Timeline extended by 2+ months
After Award Agreed:
- Requires new Section 2 notice for materially different work
- Previous Award becomes void
- Must go through entire party wall process again
- Surveyor fees likely 60-80% of full fees (some work already done, but new Award required)
- Timeline extended significantly (4-5 months)
After Construction Started:
- Extremely problematic
- Original Award covers specific works (hip-to-gable)
- Different works (dormer) not covered
- Must stop work, serve new notice, obtain new Award
- Neighbor could claim breach of Party Wall Act
- Costs increase dramatically (contractor standdown, extended timeline, additional surveyor fees)
Recommendation: Finalize your loft conversion design before serving party wall notices. Design changes are expensive and time-consuming once party wall procedures begin. If uncertain, consult with architect and loft conversion specialist before committing to hip-to-gable vs dormer decision.
Do I need party wall notice if my neighbor is detached (not semi-detached)?
No, if your property is genuinely detached with no shared walls:
- No party walls exist
- Party Wall Act does not apply
- No party wall notices required
- No surveyor fees
However, verify carefully:
- Some properties appear detached but have shared boundary walls (between gardens)
- Some “detached” properties are actually end-of-terrace with one party wall
- Victorian/Edwardian properties sometimes have party walls that aren’t immediately obvious
If you have any shared walls, even small boundary garden walls, party wall procedures apply to the extent works affect those shared structures.
Recommendation: If any doubt about whether you have party walls, consult a party wall surveyor for a preliminary assessment (often free or £50-£100 for site visit). Better to confirm upfront than discover mid-construction you should have served notices.
Cost-Benefit Analysis: Hip-to-Gable Loft Conversions
Understanding party wall costs in context of total project value:
Typical Hip-to-Gable Project – Outer London Semi-Detached:
Project Costs:
- Loft conversion construction (hip-to-gable, ensuite): £42,000
- Architect fees (design + planning application): £3,800
- Structural engineer: £1,400
- Planning application fee: £206
- Building Regulations: £900
- Party wall fees: £1,050
- Contingency (10%): £4,936
- Total project cost: £54,292
Party wall fees: 1.9% of total project cost
Property Value Impact:
- Property value before (3-bed semi): £425,000
- Property value after (4-bed semi with ensuite): £475,000-£490,000
- Value gain: £50,000-£65,000
- Return on investment: 92-120%
Party wall fees as % of value gain: 1.6-2.1%
Typical Hip-to-Gable Project – Inner London Semi-Detached:
Project Costs:
- Loft conversion construction (hip-to-gable, ensuite, high spec): £58,000
- Architect fees: £5,200
- Structural engineer: £1,800
- Planning application: £206
- Building Regulations: £1,100
- Party wall fees: £1,250
- Contingency (10%): £6,756
- Total project cost: £74,312
Party wall fees: 1.7% of total project cost
Property Value Impact:
- Property value before (3-bed semi): £625,000
- Property value after (4-bed semi with ensuite): £695,000-£720,000
- Value gain: £70,000-£95,000
- Return on investment: 94-128%
Party wall fees as % of value gain: 1.3-1.8%
Key Insights:
- Party wall fees consistently 1.7-2% of project costs across different scales and locations
- Hip-to-gable conversions deliver 90-130% ROI even accounting for all professional fees
- Party wall fees represent 1.3-2.1% of value gained—minimal relative to benefit
- Proper procedures protect your £50k-£95k value gain from disputes and legal complications
When Party Wall Costs Are Worthwhile:
- You’re spending £42,000-£58,000 on construction
- Your property gains £50,000-£95,000 in value
- Adding a bedroom (3-bed to 4-bed) significant market impact
- Creating ensuite adds premium value
- Proper party wall procedures protect this investment from disputes costing £10,000-£30,000+
- Paying £1,050-£1,300 for professional management is proportionate protection
False Economy:
Attempting to save £1,050 in party wall costs by:
- Not serving proper notices: Risks £8,000-£25,000 in retrospective legal costs
- DIY notices without surveyor: Risks delays costing £2,000-£5,000 in contractor standdown
- Ignoring neighbor concerns: Risks relationship breakdown, potential injunction (£10,000+ legal costs)
The £1,050-£1,300 party wall investment is insurance protecting a £42,000-£58,000 construction project delivering £50,000-£95,000 value gain.
Final Recommendations for Hip-to-Gable Party Wall Success
- Start Early – 8-10 Weeks Before Construction
Begin party wall procedures once planning permission is granted (or permitted development confirmed). The two-month notice period for Section 2 work means you need to start earlier than for dormers or other projects. Aim for Party Wall Award completion coinciding with Building Regulations approval and contractor availability.
- Commission Foundation Assessment Before Finalizing Design
The single biggest risk in hip-to-gable conversions is discovering mid-project that existing foundations are inadequate. Spend £400-£800 on foundation inspection/trial pit before committing to hip-to-gable design. If foundations marginal, consider lightweight construction (timber frame) for raised section or alternative dormer design.
- Invest in High-Quality Weatherproofing Specification
Don’t economize on weatherproofing materials. The £500-£1,000 difference between basic sand/cement render and premium polymer render is insignificant compared to the £5,000-£15,000 cost of remedial works if weatherproofing fails. Specify Code 5 lead flashing (not Code 4) for high-exposure sites. Consider 10-year weatherproofing guarantee from specialist contractor.
- Neighbor Relations – Proactive Not Reactive
Show neighbor your planning-approved drawings before serving formal party wall notice. Address their concerns proactively:
- Explain weatherproofing measures preventing water damage
- Emphasize professional contractor, not DIY
- Provide timeline so they can plan around noisy phases
- Offer goodwill gestures (neutral gable color, replacing shared fence)
30 minutes invested in neighbor relations prevents 90% of party wall complications.
- Appoint Experienced Pyramus and Thisbe Club Party Wall Surveyors
Choose surveyors with specific hip-to-gable experience, not just general party wall knowledge. Ask:
- “How many hip-to-gable party wall projects have you completed?”
- “What weatherproofing specifications do you typically recommend?”
- “Have you handled semi-detached properties with foundation capacity issues?”
professionally qualified surveyors with semi-detached property experience prevent disputes more effectively than generic surveyors.
- Budget Realistically for Total Costs
Don’t just budget £1,050 for party wall and expect no other costs. Realistic budget includes:
- Party wall surveyor fees: £1,050-£1,300
- Foundation assessment: £400-£800
- Premium weatherproofing: £500-£1,000 extra
- Contingency for neighbor goodwill: £300-£600
- Total “party wall related” budget: £2,250-£3,700
This is still only 4-6% of typical hip-to-gable project costs (£42,000-£58,000) and prevents delays worth far more.
- Schedule Construction for Weather
Party wall raising exposes both properties to weather during critical 2-3 week phase. Schedule this phase for April-September (drier months) to minimize water damage risk. If autumn/winter construction unavoidable, budget extra for comprehensive temporary weather protection (tarpaulins, temporary roof covering, dehumidifiers).
- Documentation is Permanent Protection
Hip-to-gable weatherproofing obligations are indefinite. Maintain comprehensive documentation:
- Original Section 2 notice with technical drawings
- Party Wall Award with weatherproofing specifications
- Schedule of Condition photos (your copies + surveyor’s)
- Weatherproofing inspection certificates
- Contractor warranties for render and flashing
- Annual weatherproofing inspection photos (self-maintained record)
When you sell, buyers will want this documentation. It demonstrates professional approach and protects buyer from hidden party wall liabilities.
- Consider Mirror Conversion Coordination
If your neighbor expresses any interest in hip-to-gable conversion (even “someday maybe”), explore coordination:
- Joint surveyor appointment (20-30% saving)
- Staggered construction (you go first, they follow 6 months later)
- Shared learning (they benefit from your experience, contractor relationship)
Even if they’re not ready now, maintaining good relationship means future cooperation if they do convert later.
- Annual Weatherproofing Inspection
After completion, inspect your gable weatherproofing every spring:
- Check render for cracks (fill immediately if <2mm, professional assessment if >2mm)
- Inspect flashing (ensure properly adhered, no gaps, pointing intact)
- Check DPC visible and intact
- Photograph condition for records
£100-£200 annual maintenance prevents £5,000-£15,000 major weatherproofing failures. Your indefinite obligation makes annual checks a prudent investment.
Contact Survey of Party Wall for Hip-to-Gable Conversion Guidance
Hip-to-gable loft conversions are transformative projects for semi-detached homes, adding valuable bedroom space and ensuite facilities while raising party walls that require specialist party wall expertise. Our team specializes in hip-to-gable party wall procedures, ensuring smooth processes, proper weatherproofing specifications, and timely Awards that keep your loft conversion on schedule.
Our Hip-to-Gable Expertise:
- Semi-Detached Specialists: 150+ hip-to-gable party wall projects completed 2023-2024
- Weatherproofing Focus: Detailed specifications preventing post-completion disputes
- Foundation Assessments: Can coordinate structural assessment to verify capacity before works
- Fast-Track Service: Awards typically completed in 5-6 weeks from initial instructions
- Fixed Fees: Transparent pricing—£450-£700 for building owner’s surveyor services
Free Initial Consultation:
We provide a complimentary 30-minute assessment where we’ll:
- Review your loft conversion drawings and structural calculations
- Confirm Section 2 party wall requirements
- Assess foundation capacity considerations
- Provide a fixed fee quote for surveyor services
- Explain two-month notice period and timeline
- Answer your specific questions about your hip-to-gable project
Next Steps:
- WhatsApp Your Project Details: Send drawings, structural engineer’s report, and planning consent.
- Schedule Consultation: We’ll arrange a call or video meeting at your convenience within 48 hours
- Receive Detailed Proposal: Get your fixed-fee quote, timeline, and weatherproofing specification recommendations
- Appoint Us: Once you’re happy to proceed, we’ll prepare your Section 2 Party Wall Notice
- Relax: We handle the entire party wall process, liaising with neighbors and their surveyors while you focus on your loft conversion
Why Choose Survey of Party Wall for Your Hip-to-Gable Conversion:
✅ Semi-Detached Property Specialists – We understand 1930s-1980s semi construction
✅ Weatherproofing Expertise – Detailed specifications preventing future issues
✅ Fixed Transparent Fees – £450-£700 building owner surveyor (no hidden costs)
✅ Fast Turnaround – 5-6 week typical timelines, not 8-10 weeks
✅ Foundation Assessment Coordination – Can arrange structural inspections if needed
✅ Available Nationwide – Covering all UK regions for hip-to-gable conversions
Visit our party wall surveyor services for loft conversions page for more information, or contact our loft conversion specialists directly to discuss your hip-to-gable project.
Related Resources:
- Complete Party Wall Act Guide 2025 – Comprehensive overview of all Party Wall Act sections, including Section 2
- Party Wall Costs Guide: What You’ll Really Pay – Detailed cost breakdowns comparing hip-to-gable with other loft types
- Loft Conversion Party Wall Notice Complete Guide – General loft conversion party wall requirements
- Party Wall Process Step-by-Step Guide – Complete timeline and procedural guide
- Rear Extension Party Wall 3-Metre Rule Guide – Understanding different party wall sections
Copyright & Usage:
© 2025 Survey of Party Wall. All rights reserved. This content may be shared and referenced with appropriate attribution and links. For reproduction, commercial use, or incorporation into professional guidance materials, please contact our team for licensing arrangements.